Friday, 11 December 2009

Finishing Touches

Once the body had been dyed I was able to use the pattern I had made for the body to cut out a fux suede underside for the body of the wolf.

I then contacted National Fiber Technology To ask them about suitable adhesives. They suggested a particular contact adhesive which unfortunately I could not find this particular product at short notice. Therefore I used evo stick the contact adhesive we have here. This worked fine. However, I now realise I shoud have sourced these kinds of products earlier in the project to prevent this last minute panic.

Once the underside was glued I trimmed away the edges.

With the underside in place I moved on to the claws. I sculpted the claws out of sculpy and then baked, painted and varnished them. Once they were dry I Glued them to the suede using the same contact ahesive. When the claws were in place I was then abe to trim away the remaining long fur from the paws.

With the body complete for finishing touches I moved on to the head.

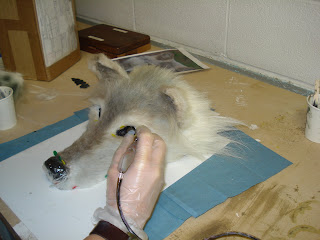
I put the eyes in place and sealed them in with the tinsil gel 10. I then punched the whiskers.

I painted the teeth I cast with acrylics and used some black pigmented silicone to make a fleshy gum texture above the teeth.

I then secured these in place with more tinsil gel 10.

This was the last finishing touch I added to the model. However, Even though the project is finished I believe I may make alterations in time. This I shall discuss in my report.

Below is the Wolf skin as it is now


Wednesday, 2 December 2009

Airbrushing the Body

I spent the morning before I airbrushed the body of the wolf attaching the head to the body. I stitched the head on as seamlessly as possible to help with the continuity of the fur. I felt that with the head attached I would be able to get a better colour reference when dying the body.

Like I did with the head I began the airbrushing process on the body by dying the backing of the fur. Once this was dry I concentrated on airbrushing the body downwards. I began with a coat of black. I lifted the fur and aibrushed the roots as best as I could. I then moved on to a brown and black combination, attempting to create a darker stripe down the back. I finished with a lighter brown towards the edges and a black tipped tail.

Here are pictures of the process.

Body Pattern

Once the head was airbrushed I concentrated on cutting out the body. To begin I had to examine the measurements of the wolfkin I went to see, in addition to the measurements I had from books, and internet sources. Once I found a suitable size I had to ensure it would fit on the lenght of fabric I had generously been donated by National Fiber Technology. To make a pattern I found a large piece of paper and drew the measurements on in pencil, marking out the lenghts of the limbs and distances between them.

I then cut this pattern out. Once cut I had to sever the limbs to ensure it would fit on the fabric. Below is an image of the pattern laid out.


With the pattern laid out on the fabric I was able to carefully cut around it. I chose my cuts carefully to ensure I had a good length of fur spilling over the side of the wolf's back. I marked out each limb and ensured they were facing the correct direction.

Having all my pieces cut out I was then able to stitch the limbs to the body. I tried to make sure that the seams were covered by the flowing fur on the arms, legs and tail.

Below is an image of the body all sewn together.

Airbrushing

I sprayed some samples of fur and left them over night to ensure there would be no adverse reaction to the dye I was using. The next day when I found that the fur had no reaction to the dye so I began the process of spraying.


I Began by spraying the backing of the fur a dark brown colour to give the roots a denser look. Once this was dry I then re-attached the pattern of fur to the sculpt and pinned it in place. This enabled me to spray the fur using the wolf's contours as a guide.


I sprayed the brown dye over the nose and head area, using pictures for reference. I then added black to add tone and depth.