Friday, 11 December 2009

Finishing Touches

Once the body had been dyed I was able to use the pattern I had made for the body to cut out a fux suede underside for the body of the wolf.

I then contacted National Fiber Technology To ask them about suitable adhesives. They suggested a particular contact adhesive which unfortunately I could not find this particular product at short notice. Therefore I used evo stick the contact adhesive we have here. This worked fine. However, I now realise I shoud have sourced these kinds of products earlier in the project to prevent this last minute panic.

Once the underside was glued I trimmed away the edges.

With the underside in place I moved on to the claws. I sculpted the claws out of sculpy and then baked, painted and varnished them. Once they were dry I Glued them to the suede using the same contact ahesive. When the claws were in place I was then abe to trim away the remaining long fur from the paws.

With the body complete for finishing touches I moved on to the head.

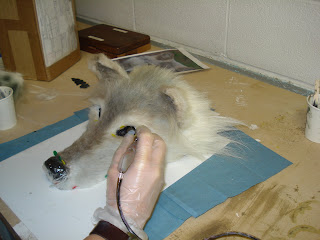
I put the eyes in place and sealed them in with the tinsil gel 10. I then punched the whiskers.

I painted the teeth I cast with acrylics and used some black pigmented silicone to make a fleshy gum texture above the teeth.

I then secured these in place with more tinsil gel 10.

This was the last finishing touch I added to the model. However, Even though the project is finished I believe I may make alterations in time. This I shall discuss in my report.

Below is the Wolf skin as it is now


Wednesday, 2 December 2009

Airbrushing the Body

I spent the morning before I airbrushed the body of the wolf attaching the head to the body. I stitched the head on as seamlessly as possible to help with the continuity of the fur. I felt that with the head attached I would be able to get a better colour reference when dying the body.

Like I did with the head I began the airbrushing process on the body by dying the backing of the fur. Once this was dry I concentrated on airbrushing the body downwards. I began with a coat of black. I lifted the fur and aibrushed the roots as best as I could. I then moved on to a brown and black combination, attempting to create a darker stripe down the back. I finished with a lighter brown towards the edges and a black tipped tail.

Here are pictures of the process.

Body Pattern

Once the head was airbrushed I concentrated on cutting out the body. To begin I had to examine the measurements of the wolfkin I went to see, in addition to the measurements I had from books, and internet sources. Once I found a suitable size I had to ensure it would fit on the lenght of fabric I had generously been donated by National Fiber Technology. To make a pattern I found a large piece of paper and drew the measurements on in pencil, marking out the lenghts of the limbs and distances between them.

I then cut this pattern out. Once cut I had to sever the limbs to ensure it would fit on the fabric. Below is an image of the pattern laid out.


With the pattern laid out on the fabric I was able to carefully cut around it. I chose my cuts carefully to ensure I had a good length of fur spilling over the side of the wolf's back. I marked out each limb and ensured they were facing the correct direction.

Having all my pieces cut out I was then able to stitch the limbs to the body. I tried to make sure that the seams were covered by the flowing fur on the arms, legs and tail.

Below is an image of the body all sewn together.

Airbrushing

I sprayed some samples of fur and left them over night to ensure there would be no adverse reaction to the dye I was using. The next day when I found that the fur had no reaction to the dye so I began the process of spraying.


I Began by spraying the backing of the fur a dark brown colour to give the roots a denser look. Once this was dry I then re-attached the pattern of fur to the sculpt and pinned it in place. This enabled me to spray the fur using the wolf's contours as a guide.


I sprayed the brown dye over the nose and head area, using pictures for reference. I then added black to add tone and depth.


Monday, 23 November 2009

Trimming

With the fabric stiched together and pinned to the silicone cast I began the process of trimming the lengthy fur.

Using my reference pictures I began trimming the fur to short lenghts along the muzzle and sides of the face. I used hair dressing trimmers which worked fairly well, but sometimes got caught in the goat hair. I used scissors as well for certain parts of the fur.

Cutting The Fur Fabric

With the pattern made, I layed it on the fur fabric in the most space efficient way as possible. I also had to pay close attention to the direction of the fur making sure it ran down the wolf's head from the nose to the ears. I pinned it to the fabric and cut out the first piece.


I cut the second piece out without any problems. However, I made a mistake on the third piece as I discovered once i'd cut it out that the fur was going in the wrong direction. This was unfortunate as it meant I had to cut another piece out of my fabric. Once rectified I had the three pieces I needed to stitch together to form the fur on the wolf's face.


I pinned these three pieces together and began to stitch them trying to make the seam as invisible as possible. I sourced some clear nylon thread which is both strong and ideal for concealing itself among the fibers of the fabric.

I decided to stitch the seams completely, covering over where the eyes would be, and cut the eyes out once I'd shaven the fur.

With the pieces stichted together I pinned them to the silicone cast.

Pattern making

To make the pattern for my wolf's head I used clingfilm and selotape, a technique suggested by Jeremy Hunt. I also tried using paper and laying it on top of the silicone head, a more conventional method of pattern making. This method wasn't as effective as I had hoped as the paper was too rigid to lay nicely on top of the head to ensure a good fit.

The clingfilm was used to form around the shape of the head, and the tape was used to make the clingfilm firm enough to hold the shape of the head.

I used strips of tape in layers. Once enough layers had been applied, I pulled the tape and clingfilm off the head and trimmed off the excess. I then placed the pattern back over the head and drew lines on the tape where I thought the cuts and seams should be.

I then cut the tape to make the pattern to lay on the fabric.


With the pattern made I needed to ensure that it could be flattened out so that the fabric could be cut to fit the head. Fortunately the fur fabric is stretchy so it contours to the head quite well.

The next step is to cut out the fabric to the shape of my pattern.

Thursday, 12 November 2009

Casting

I began the process of casting my wolf head a few days ago. To begin I sprayed release agent into the mould. I then thought about the methods I would use to cast the head. To help my cause I decided to ring Russel at Mould Life. He was extremely helpful and recommended I begin by stippling in the detail using the fast catalyst, and then paint the bulk of the head in layers using a thixotropic agent.

Taking on board Russel's advice I used a brush and stippled the silicone into the details such as the nose and eyes. I then began painting in layers. I found this method to be quite slow, having to wait for each layer to cure before adding the next.
After two days of this process the head was just about thick enough for me to demould.


In addition to casting the wolf head I also cast the wolf teeth out of resin from the silicone mould I made. Whilst I was painting in the tinsil gel into the wolf head mould I also painted some onto the teeth I cast. I thought this would be an effective way of masking the teeth so I can spray the gums the right colour.


I now need to tidy up the cast by cutting of the flanges and rounding off the gums. Once the gums are even I will cut out the silicone eyes and replace them with the glass eyes I bought.

Tuesday, 10 November 2009

Moulding

Last week was dedicated to moulding my wolf head sculpt. I began the process by covering the clay sculpt in Gel Coat, this process picks up the important detail on the nose and around the eyes. Once this had gone tacky I began laying on the fiberglass matting and resin. After about two-three coats of this, I left it to dry over night.


Once the fiber glass mould was cured I was able to take out the clay. Unfortunately this method of moulding is one shot only. So the clay comes out in pieces. It took a good amount of time spent picking out the clay before I was even able to clean it properly.

Once it was clean I was able to begin the moulding process. I began by mixing up the tinsil gel 10, the black pigment, and the fast catalyst. I then stippled the silicone into the details, such as the nose and the eyes. I then began painting in layer after layer of silicone.

Unfortunately this method is very slow. I decided to termintae this method and use the work I did as a test.

I shall redo the cast, hopefully using a better method.

Thursday, 5 November 2009

Sculpting continued

This week I spent most of my time sculpting the wolf head. I tried to get as much feedback from my peers as possible to help me achieve the right look for my wolf head. I have been waiting for the arrival of my wolf's eyes and jaw set this week. They arrived on the 4th of November and from the eyes I was able to make replicas which I have put into the clay sculpt.

This has enabled me to close the eye lids around the eyes so that hopefully the real eyes will fit nicely. For now the replica eyes I made have helped me to get the eye lids to look more realistic. Until now the empty sockets distracted the viewer from the wolf head as a whole. The sculpt is already hard to identify, as it without the fur and looks very strange.

Having recieved the jawset this week I have prepared a mould for the upper jaw. I wish to mould and cast the teeth because currently part of the form which holds the jaw open when set against the lower jaw is protruding downwards. I wish to remove this so I will mould and cast without including this part.


I hope to start working with the fur next week as I am going home to collect it this weekend.

Saturday, 24 October 2009

Roman Military Research Society

Todat I went to the Lunt Roman Fort in Coventry to visit the "Roman Military Research Society" who were training at the site. After some email communication I learned that the re-enactors would be training there over the weekend. I enquired about the presence of wolfskins and found out that there may have been an opportunity for me to see a real one.

Fortunately this information was correct and I was able to meet with some of the members of the society and photograph and measure one of their wolfskins. Below are some of the pictures I took for reference.


In addition to the photographs I also made notes on the various sizes and dimensions of the different parts of the wolf's body.

This particular wolfskin measured 5ft from the nose to the tail.
(5ft length)

Its Front leg span was 4.5ft including paws.

The girth of the wolfskin was 18 Inches just before the front legs.
21 Inches under the front legs and across the back.

The length from the arm pit to the beginning of the back legs was 22 Inches.

The length from the nose tip to the back of the skull was 1ft (12 Inches)

The ears were situated at the back of the skull and were 3 Inches high and 3.5 inches wide.

The tip of the muzzle was 2-2.5 inches wide

The mouth was roughly 6 inches in length from the tip to the corners.

The legs were 4-5 inches wide

The back legs were 13 inches (damaged)

The tail was 9 Inches (damaged)

The distance from the nose to the beginning of the front leg was 21 inches

The length of the fur varied around the body:

The muzzle hair was about 5mm in length

The paw fur was about 10mm long

The fur running along the back of the front legs was about 1 inch in length

The fur on the back was about 3-4 inches long.

Sculpting

With the armature finished I began sculpting the skull on to it. I have decided to use chavant clay because of its positive properties. These pictures show the sculpt after about two days.

Armature

Before I began the sculpt of the wolf's head I needed to make an armature. I Began making the armature out of blue foam, and mounted it on a piece of MDF. I then padded out the shape a little more with some foil. Once I had the basic skull shape I decided to vac form it. My reasoning behind this is the fact that I have bought some taxidermists wolf teeth. When they arrive I want to be able to see if they fit inside my skull cap structure. I therefore thought If it was a shell, that I would be able to see if they fitted before I moulded and cast the final skull, and possibly make asjustments before it's too late.

I am now using the vacuum formed skull shape as my armature and am sculpting on top of it.

Friday, 16 October 2009

Moulding

This week I took the nose sculpts and moulded them in different ways. I first moulded one of the noses using a simple silicone mould. This method is fine but takes up quite a lot of silicone. Although not a problem for the size of the nose, when I mould the whole head it will take a lot of silicone which would be wasteful. The pictures directly below show the noses I cast in fastcast. I used varying quantities of black pigment to colour them.


The other method of moulding I tried this week was a cavity mould. I had not tried this method before so it was a good experience, and beneficial to my project and learning.
First I took one of the nose sculpts and covered it in foil. I used a layer of foil to protect the clay nose underneath. I then covered the foil in a layer of clay and formed some locators and a pour hole. Once this was done I Covered the clay in a layer of Gel Coat about 2-3mm thick. Once this was tacky I began the process of fiberglassing the mould. After a few layers of fiberglass I left the mould to dry over night.
The next morning when the fiberglass was dry, I Drilled some holes into the fiberglass and baseboard, these acted as locators and a fastening point for re-ataching the fiberglass to the board for the next stage of moulding. After the holes had been drilled I Removed the fiberglass jacket from the board and removed the clay and foil. I then placed the fiberglass jacket back over the master (nose) and fastened it with bolts and wingnuts.

The next stage was to make and pour some silicone into the pour hole I made in the fiberglass, therefore filling the cavity made by the clay and surrounding the master inside. I left this over night to set and the next day I took out the master leaving me with the finished cavity mould.

Tuesday, 13 October 2009

Noses Noses Noses

As one of the most detailed fleshy parts of a wolf's body I have decided to concentrate on sculpting the nose. This will be one of the only exposed parts of the final sculpt. I have spent a few days trying different sculpting materials and different styles of wolf nose and textures.

So far I have tried; soft chavant, Airdry clay and Wed clay. I found the chavant quite slow going, but the results seem to hold a good amount of detail. The Airdry clay was very soft and quick to work with. However, getting detail into the clay was a little more tricky due to the responsiveness of the clay. The Wed clay I found to be very similar to the Airdry clay, it dried a little quicker and kept detail a little better but had a similar responsiveness to the Airdry clay.


I will now observe the moulding qualitites of the sculpting materials by moulding and casting each nose and comparing the quality of the results. I will hopefully from these tests be able to choose my final sculpting material.